11+ Rich Girl Braided Hairstyles and Tips You’ll Love to try
When it comes to hair, there’s something about braids that exude elegance, sophistication, and luxury. Whatever you do even when you’re preparing for a formal event, a casual outing, or simply want to elevate your everyday look, braided hairstyles have a way of making you feel like a million bucks. In this blog post, we’ll be jumping into the top chic rich girl braided hairstyles that can take your look from basic to breathtaking. Let me show you how I make these chic, easy-to-do styles a go-to for any occasion.
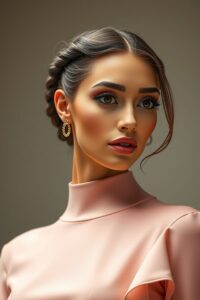
1. The Crown Braid: A Royal Touch
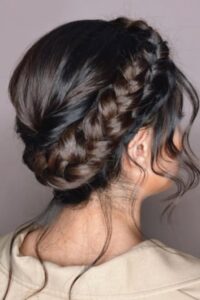
The crown braid is a style that screams royalty and sophistication. This gorgeous braid wraps around your head like a crown, creating an elegant yet playful look that works perfectly for both day and night. From my own personal experience, I can say this style instantly transforms your appearance into something regal. It’s a great go-to if you’re looking to add a touch of class without too much effort.
How to Style the Crown Braid:
To begin, start by parting your hair down the middle. Take a section of hair from one side of your head, right at the temples, and begin braiding it tightly toward the back. As you move toward the opposite side of your head, pull in additional hair from underneath, creating a Dutch braid effect that adds volume. Continue until you reach the nape of your neck, and then either secure the braid with a hair tie or tuck the ends under the braid and pin it in place.
For a flawless finish, you can gently pull at the edges of the braid to make it look fuller and more relaxed. This small detail will ensure that the braid doesn’t look too tight and stiff. If you’re feeling extra luxurious, you can add a few sparkly hairpins along the braid to give it that “rich girl” glam.
Tips for the Crown Braid:
- If your hair isn’t long enough to create a full crown, you can cheat by using hair extensions. This way, you’ll have the length to make the braid more dramatic and voluminous.
- For an even more polished look, use a smoothing serum or hair gel to tame flyaways around the hairline before styling the braid.
- Crown braids pair beautifully with elegant dresses or casual chic outfits, so you can rock it wherever you go!
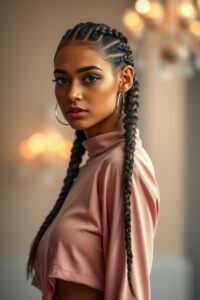
2. The Fishtail Braid: A Chic, Luxe Vibe

The fishtail braid is another braid that immediately gives off a chic, high-fashion feel. It’s sleek, detailed, and perfect for creating a sophisticated look that still feels laid-back. Whether you’re heading to brunch or attending a special event, this braid will add a subtle touch of elegance. Based on my overall experience, I love how versatile the fishtail braid can be, effortlessly taking you from a casual day out to a more formal evening event.
How to Style the Fishtail Braid:
Start by dividing your hair into two equal sections. Next, take a small section of hair from the outside of one side and cross it over to the other section. Then, repeat this process with a small section from the other side, crossing it over to the first side. Continue working your way down, ensuring the sections stay even and tight. Once you reach the end of the braid, secure it with a hair tie, and for a more “luxe” look, gently pull the braid apart for added volume and texture.
You can leave a few strands loose to frame your face, or tuck them behind your ear for a cleaner look. For that rich girl feel, apply a shine spray or serum to give the braid a healthy, glossy finish that catches the light.
Tips for the Fishtail Braid:
- If you’re in a rush, you can make the fishtail braid slightly looser for a more relaxed, beachy look. But if you want it to look more formal, make sure the sections are neat and tight.
- The fishtail braid can be styled on any hair type, from straight to curly. It’s an incredibly versatile style.
- If you’re looking for an extra luxe twist, pair the fishtail braid with a silk scarf or headband. This small addition will enhance your rich girl vibe!
3. The Boho Braided Bun: A Blend of Relaxed and Refined
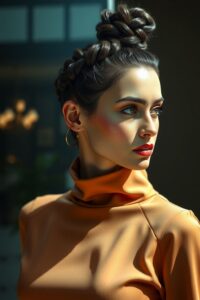
A boho braided bun is the ultimate fusion of effortless charm and sophisticated elegance. This hairstyle is a perfect balance between playful and polished, making it a great choice for a day-to-night look. Whether you’re attending a garden party or having a brunch date, the boho braided bun can help you channel that “I woke up like this” yet chic look. It’s simple, quick, and makes you look put-together in no time!
How to Style the Boho Braided Bun:
Begin by creating two small braids from the front sections of your hair. These braids should start near your temples and go toward the back of your head, crossing at the nape of your neck. Once your braids are secured, gather the remaining hair into a loose ponytail. Twist the ponytail and wrap it around the base, securing it with pins to create a messy bun.
Next, pull the two braids toward the front and pin them in place across the top of your head, allowing them to frame your face. You can gently pull the braids apart for more volume, and leave a few tendrils of hair loose for a more relaxed, boho vibe. If you want more of a “rich girl” touch, finish the look with a small decorative hairpin or a delicate gold headband.
Tips for the Boho Braided Bun:
- Use a texturizing spray or sea salt spray before styling to give your hair more volume and texture. This will ensure your braids look fuller and more natural.
- For a more polished version of this look, keep the bun tighter and avoid pulling the braids apart too much.
- You can wear the boho braided bun with anything from a flowy dress to a pair of high-waisted jeans and a blouse. It’s incredibly versatile and easy to dress up or down.
4. The Dutch Braid: Bold and Beautiful
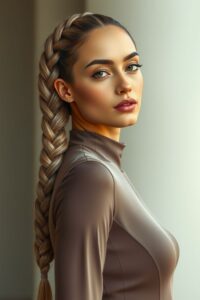
The Dutch braid is a favorite for those looking for a bold, edgy twist on traditional braids. It’s similar to the classic French braid but with an inverted, 3D effect that adds texture and volume. This braid has a distinct, bold appearance, which gives it that rich girl, “I’m ready for the runway” vibe. From my own personal experience, I can confidently say that the Dutch braid is not just a statement piece but also an incredibly versatile style that works well for all occasions.
How to Style the Dutch Braid:
Start by dividing your hair into three equal sections, just like a traditional braid. The key difference with the Dutch braid is that, instead of crossing the sections over one another, you’ll cross them underneath. This creates that raised, 3D effect that makes the braid stand out. As you continue, be sure to pull in small sections of hair from the sides to keep the braid even and tight.
Once you reach the nape of your neck, secure the braid with a hair tie, and for that extra rich girl touch, gently pull the edges of the braid to make it appear fuller. This gives the braid a more relaxed, voluminous look, which is always a nice touch. You can even make two Dutch braids for a more dramatic effect, which adds instant flair and sophistication.
Tips for the Dutch Braid:
- The Dutch braid looks best when it’s a bit messy. Don’t be afraid to pull at the braid for extra volume and a more carefree vibe.
- For a sleek, refined version of the Dutch braid, keep the braid tight and even. Use a smoothing serum to ensure no flyaways.
- If you want a more relaxed Dutch braid, consider using a texturizing spray before starting the braid. This adds volume and makes the braid look fuller.
5. The French Braid Bun: Elegant and Timeless
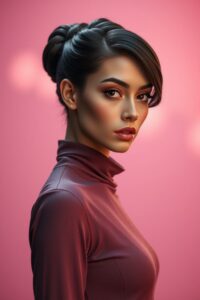
The French braid bun is another classic that screams luxury. It combines the sophistication of the French braid with the timeless appeal of a bun. This style is great for special occasions or just a day when you want to look effortlessly elegant. Based on my overall experience, this hairstyle gives off an air of refinement and poise, making it perfect for any “rich girl” vibe.
How to Style the French Braid Bun:
Start by parting your hair and creating a French braid from the top of your head down toward the nape of your neck. As you braid, incorporate sections of hair from the sides, creating a smooth, tight braid. Once you’ve reached the nape of your neck, secure the braid with a hair tie.
Next, gather the rest of your hair into a high ponytail, twist it, and wrap it around the base to form a bun. You can either pin the bun in place or use a hair tie to secure it. To finish off the look, gently pull at the French braid to make it fuller and slightly loose, giving it a relaxed, romantic feel. This style can be accessorized with a delicate hairpin or a velvet scrunchie for added richness.
Tips for the French Braid Bun:
- Keep the braid tight for a more formal look, or loosen it up for a more relaxed vibe. Both versions will give you that rich girl feel.
- For a sleek finish, use a smoothing cream or gel to tame flyaways.
- This style works best with medium to long hair, but if you have shorter hair, extensions can be a great way to achieve the look.
6. The Side Fishtail Braid: A Twist on Classic Beauty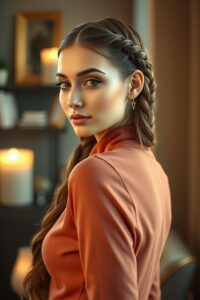
The side fishtail braid is a beautiful variation of the traditional fishtail, with a laid-back, chic twist. This style works perfectly for an elegant yet carefree look, and it’s ideal for when you want to add an extra touch of sophistication without too much effort. I’ve found that the side fishtail braid adds a sense of elegance to your look, but still lets you maintain that effortless vibe.
How to Style the Side Fishtail Braid:
Start by parting your hair to one side. Take a small section of hair from the front of your head and begin a fishtail braid, just like the regular fishtail. However, with this variation, you’ll gather all your hair to one side and continue braiding from there. Once you’ve braided all your hair, secure it with a hair tie.
For a rich girl look, gently pull on the braid to loosen it and create a more voluminous effect. This helps to achieve a relaxed but refined look. You can leave a few loose strands near your face for a more natural, soft finish. This braid is perfect for both casual days and more glamorous events.
Tips for the Side Fishtail Braid:
- If you want a more voluminous side fishtail, add a little volume to your roots before braiding. A texturizing spray works wonders for this.
- Keep the fishtail tight at the start, and only loosen it as you get closer to the end to avoid the braid falling apart.
- The side fishtail braid can be paired with anything from a flowy dress to a fitted top and jeans.
7. The Rope Braid: A Simple Yet Sophisticated Style
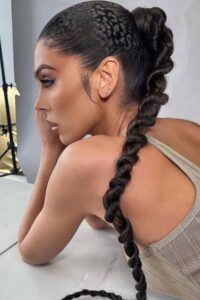
The rope braid is a stylish, understated look that exudes both simplicity and elegance. It’s easy to master, and from my own personal experience, it’s the perfect go-to when you want something quick but chic. The rope braid’s twisted texture gives it an elevated, elegant feel while still maintaining an effortless charm.
How to Style the Rope Braid:
To create the rope braid, start by dividing your hair into two equal sections. Twist each section tightly in the same direction. Once both sections are twisted, combine them and twist them together in the opposite direction. Secure the ends with a hair tie, and you’re done!
For a more textured and voluminous look, you can gently pull apart the twisted sections to give the braid a fuller effect. This style can also be accessorized with a small decorative pin or clip at the end of the braid to add a little sparkle and richness to the look.
Tips for the Rope Braid:
- The rope braid looks best when it’s slightly undone. Loosen it for a more relaxed look, or keep it tight for a sleek, polished finish.
- Add some texture to your hair before braiding for a more voluminous and full effect.
- For a more luxurious look, pair the rope braid with a deep side part and a bold lip for a chic, sophisticated vibe.
8. The Boho Chic Braid: Free-Spirited Yet Luxe
The boho chic braid is perfect for anyone who wants to combine elegance with a carefree, laid-back vibe. It’s that perfect balance of relaxed and refined. This style is loved by celebrities and influencers for its effortless beauty, and from my own personal experience, it gives off that bohemian yet luxe vibe that’s hard to resist. The messy, tousled look of the boho braid makes it feel like you’ve just stepped off the beach, but with a rich girl twist.
How to Style the Boho Chic Braid:
Start by curling your hair in loose waves to give it that beachy texture. Then, take a small section from the front of your head and start a loose braid. As you braid, keep it relaxed—don’t worry about making it too tight or perfect. Let some loose strands frame your face for a soft, romantic look. Once the braid is complete, pull at it gently to make it appear fuller and slightly messy.
Secure the end of the braid with a small elastic band, and for that added chic touch, tie a delicate ribbon, scarf, or gold hair cuff around the base of the braid. The boho braid can be worn in different variations—whether you want a single side braid or two braids that meet at the back. You can even add a few small braids throughout your hair for a more intricate boho look.
Tips for the Boho Chic Braid:
- If you want to add some volume to the braid, tease the hair at the crown of your head before braiding.
- This style looks best with texture, so make sure your hair has some natural waves or use a texturizing spray before braiding.
- Keep the braid loose for a relaxed and effortless feel, and avoid making it too neat for that authentic boho vibe.
9. The Twisted Halo Braid: Effortless Elegance
The twisted halo braid is the perfect mix of chic and effortless beauty. This soft, ethereal style creates an angelic look, making it ideal for winter dates, holiday parties, or even cozy nights by the fireplace. It’s a go-to for those who love a dreamy, romantic vibe while still keeping things simple and stylish.
How to Style the Twisted Halo Braid:
1️⃣ Start by parting your hair in the middle or slightly to the side.
2️⃣ Take a small section from one side near your temple and begin twisting it backward, adding in more hair as you go.
3️⃣ Repeat the same on the other side, then secure both twists together at the back with a small elastic or pins.
4️⃣ Gently pull at the twists for a fuller, softer look.
Styling Tips:
✨ Add soft waves for extra texture.
✨ Use a pearl or crystal clip for an elegant finish.
✨ Lightly pull out face-framing pieces for a relaxed, effortless effect.
This style is perfect for both casual and formal occasions, giving you that soft, angelic glow without trying too hard.
10. The Double Dutch Braid Pigtails: Youthful and Trendy
The double Dutch braid pigtails are a fun, youthful way to embrace the “rich girl” braided aesthetic. This style is playful and trendy, and from my own personal experience, it gives off that cool, confident vibe while still being chic. It’s perfect for those days when you want to look stylish but still feel like you’re ready for adventure. The best part? This style works for all hair lengths and textures, so anyone can rock it.
How to Style the Double Dutch Braid Pigtails:
Start by dividing your hair down the middle to create two equal sections. Then, begin with one section, and braid it using the Dutch braid technique—crossing the hair under rather than over. Once you’ve reached the nape of your neck, secure the braid with a hair tie, and repeat the same process on the other side.
The key to making this look feel rich girl-worthy is to make sure the braids are neat and tight at the beginning. Once you’re done, gently pull apart the edges of the braids for a fuller, more voluminous effect. This creates a more relaxed vibe and ensures that the braids stand out.
Tips for Double Dutch Braid Pigtails:
- For a more polished look, keep the braids tight and even. You can also use a smoothing serum to eliminate frizz and flyaways.
- If you prefer a softer, more casual style, pull at the edges of the braids to make them look looser and fuller.
- This style looks great with casual outfits, such as a denim jacket and high-waisted jeans, or even a cute dress for a more girly vibe.
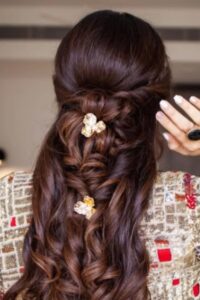
11. The Waterfall Braid: Elegant and Intricate
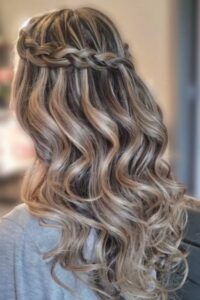
The waterfall braid is a stunning and intricate style that has become increasingly popular in recent years. It’s a sophisticated, ethereal braid that creates the illusion of cascading hair, hence the name “waterfall.” This style is perfect for anyone who wants to add a touch of elegance to their look without sacrificing their rich girl charm. From my overall experience, the waterfall braid is ideal for any special event, but it also works well for more casual occasions when you want to elevate your appearance.
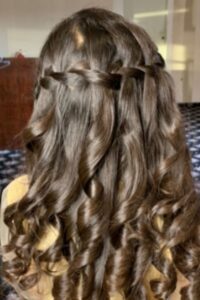
How to Style the Waterfall Braid:
Start by parting your hair to the side, and then pick up a small section of hair near your crown. Begin braiding this section in the traditional three-strand braid style, but with a twist. As you braid, drop the bottom strand of each section and replace it with a new section of hair from the side. This creates the “waterfall” effect as the hair flows down in a cascading manner.
Once you’ve braided down one side of your head, secure the braid with a small elastic band. This style works best when you keep the braid loose, allowing the hair to flow freely. For a more luxurious look, you can add small decorative clips or pins to the braid.
Tips for the Waterfall Braid:
- Keep the braid loose to enhance the “waterfall” effect. Avoid pulling it too tight, as this will reduce the cascading look.
- Adding some volume to your hair before braiding can give the waterfall braid a fuller, more dramatic effect.
- This style is perfect for weddings, parties, or even casual outings where you want to look effortlessly chic.
Which Braid Will You Try?
Now that we’ve covered a variety of rich girl braided hairstyles, it’s time to hear from you! Which braid is calling your name? Have you tried any of these braids before, or do you have your own twist on them? Share your thoughts in the comments below, and don’t forget to include your name and where you’re from so we can connect!
Whether you prefer the bold Dutch braid, the sophisticated crown braid, or the carefree boho chic look, these styles will definitely help you embrace that rich girl vibe. Experiment with different textures, accessories, and techniques to make these braids your own. We can’t wait to see how you rock them.